Sparky Fitness Installation Guide
Sparky Fitness is supposed to work very similarly to My Fitness Pal but self hosted, private, and free, so I thought I would install it and see how good it really was. This installation does not include the AI component, and I'm unsure what it adds to the app. That is for future evaluation.
SparkyFitness Installation Guide
Date: February 7, 2026
System: Ubuntu 24.04 LTS
VM: sparky-fitness-vm (192.168.1.102)
Application: SparkyFitness - Self-hosted fitness tracking alternative to MyFitnessPal
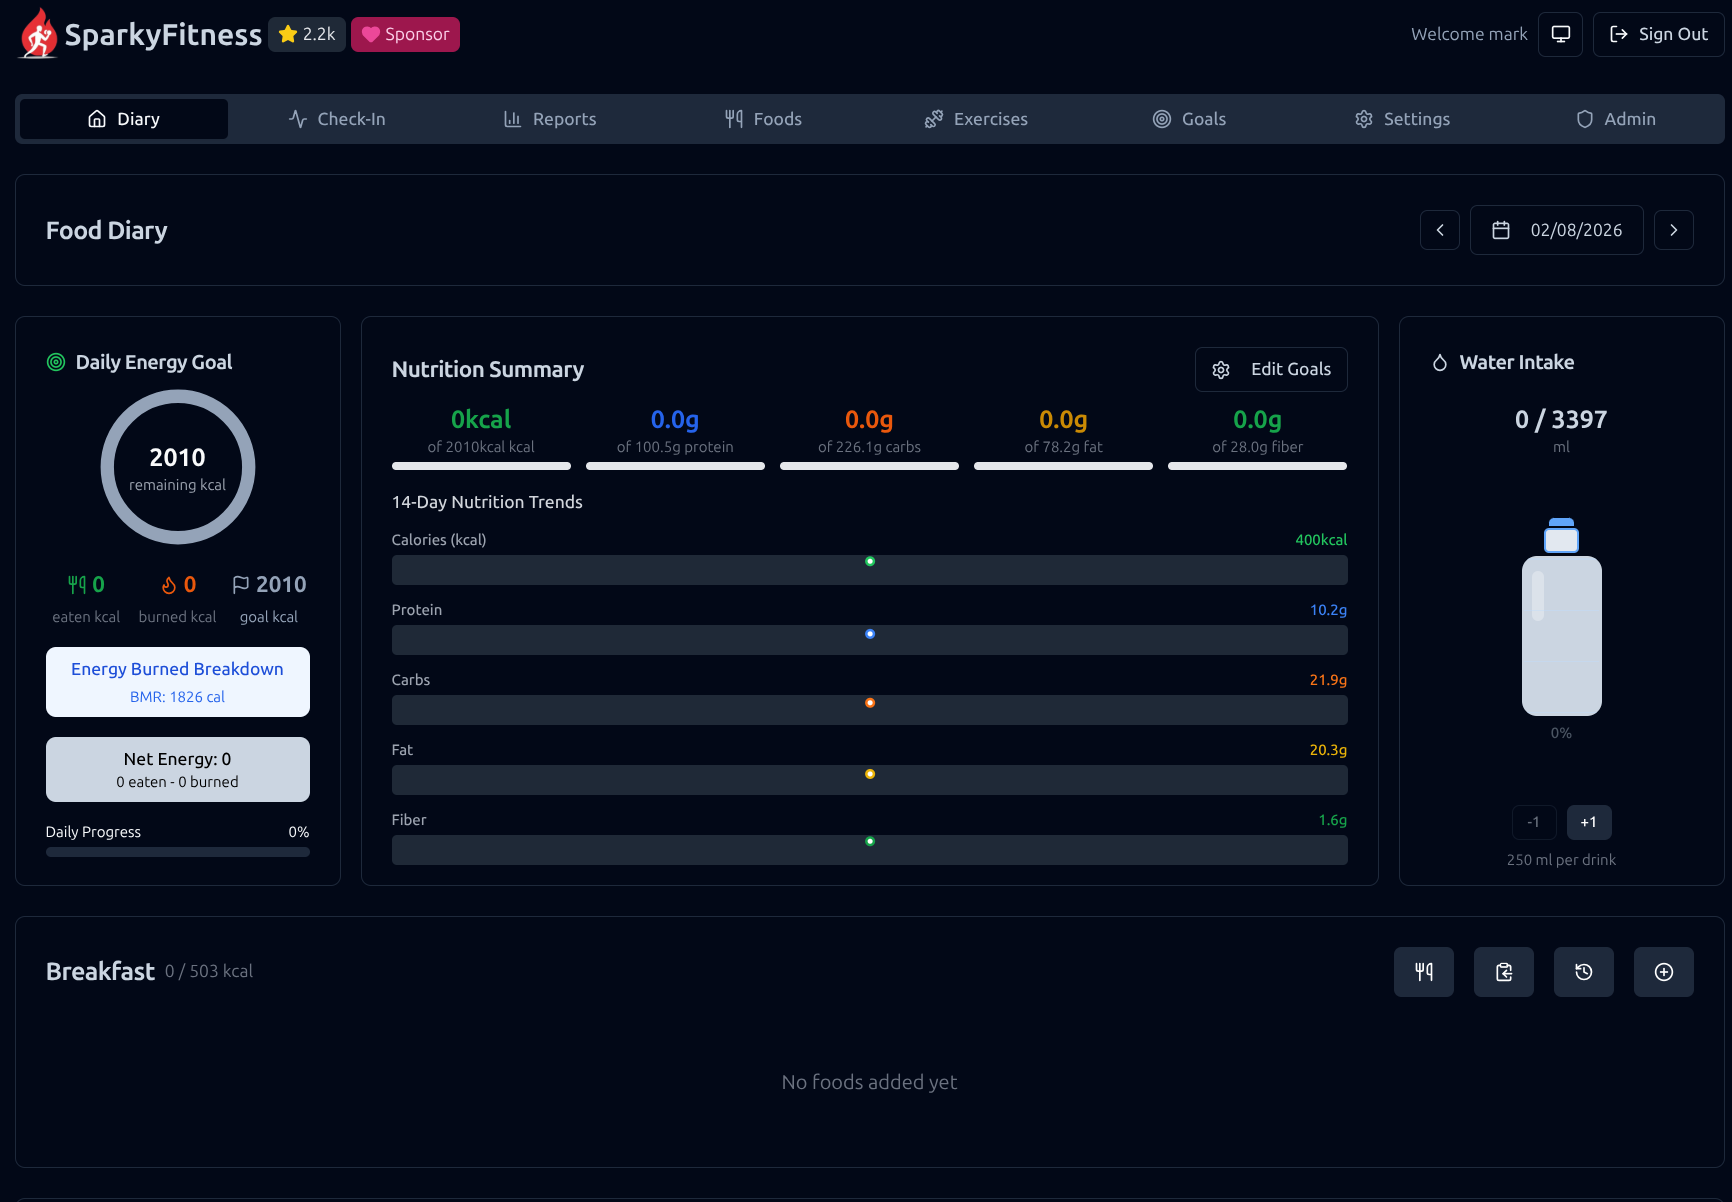
Table of Contents
- Overview
- Prerequisites
- Installation Steps
- Configuration
- Verification
- First Use
- Management Commands
- Troubleshooting
- Resources
Overview
SparkyFitness is a comprehensive, self-hosted fitness tracking application with AI-powered nutrition assistance. It provides:
- Nutrition Tracking - Meal logging, custom food database, trend analysis
- Exercise Logging - Workout tracking with comprehensive exercise database
- Body Measurements - Weight and measurement tracking with visualization
- AI Nutrition Coach - Chat-based food logging with image recognition
- Multi-user Support - Family sharing with individual profiles
- Privacy-First - Complete control over your health data
Tech Stack
- Frontend: React 18 + TypeScript + Vite + Tailwind CSS
- Backend: Node.js + Express
- Database: PostgreSQL 15 Alpine
- Deployment: Docker Compose (production configuration)
- AI Integration: Multi-provider support (OpenAI, Anthropic, Google)
Prerequisites
Required Software
- Ubuntu 24.04 LTS (or compatible Linux distribution)
- Docker and Docker Compose installed and configured
- Network access to pull Docker images
- Minimum 2 GB RAM recommended
- 5 GB disk space for application and database
Ports Required
- 3004 - Frontend web interface (externally exposed)
- 3010 - Backend API (internal, not exposed)
- 5432 - PostgreSQL database (internal, not exposed)
Ensure port 3004 is available and not in use by another service.
Installation Steps
Step 1: Create Installation Directory
Create a dedicated directory for SparkyFitness and navigate into it:
1
2
mkdir -p ~/sparkyfitness
cd ~/sparkyfitness
Step 2: Download Configuration Files
Download the production Docker Compose configuration and environment template:
1
curl -o docker-compose.yml https://raw.githubusercontent.com/CodeWithCJ/SparkyFitness/main/docker/docker-compose.prod.yml
1
curl -o .env https://raw.githubusercontent.com/CodeWithCJ/SparkyFitness/main/docker/.env.example
Files downloaded:
docker-compose.yml- Container orchestration configuration.env- Environment variables template
Step 3: Generate Security Keys
Generate secure encryption keys for the application:
1
2
echo "API_ENCRYPTION_KEY=$(openssl rand -hex 32)"
echo "BETTER_AUTH_SECRET=$(openssl rand -hex 32)"
Example output:
1
2
API_ENCRYPTION_KEY=7e1c9646a5eb91961a3dd6296197f82cb243ff7e526df359530df8a4b7b3492a
BETTER_AUTH_SECRET=8d7eac5d453fa292ce5bf259f0376f9c6b13de1d109b561fde2f3f196fc1b649
Save these keys - you’ll need them in the next step.
Step 4: Configure Environment Variables
Edit the .env file to customize your installation:
1
nano -l .env
Required changes (use Ctrl+W to search in nano):
- Database Password - Search for
SPARKY_FITNESS_DB_PASSWORD=changeme1
SPARKY_FITNESS_DB_PASSWORD=YourSecureDBPassword123!
- App Database Password - Search for
SPARKY_FITNESS_APP_DB_PASSWORD=password1
SPARKY_FITNESS_APP_DB_PASSWORD=YourSecureAppPassword456!
- Frontend URL - Search for
SPARKY_FITNESS_FRONTEND_URL=http://localhost:80801
SPARKY_FITNESS_FRONTEND_URL=http://192.168.1.102:3004
(Replace with your VM’s IP address)
- API Encryption Key - Search for
SPARKY_FITNESS_API_ENCRYPTION_KEY=changeme_replace1
SPARKY_FITNESS_API_ENCRYPTION_KEY=7e1c9646a5eb91961a3dd6296197f82cb243ff7e526df359530df8a4b7b3492a
(Use the key generated in Step 3)
- Better Auth Secret - Search for
BETTER_AUTH_SECRET=changeme_replace1
BETTER_AUTH_SECRET=8d7eac5d453fa292ce5bf259f0376f9c6b13de1d109b561fde2f3f196fc1b649
(Use the key generated in Step 3)
- Admin Email (Optional) - Search for
SPARKY_FITNESS_ADMIN_EMAIL=1
SPARKY_FITNESS_ADMIN_EMAIL=your-email@example.com
Save and exit: Ctrl+O, Enter, Ctrl+X
Note: Email configuration variables can remain blank unless you need password reset functionality.
Step 5: Verify Configuration
Verify your critical environment variables are set correctly:
1
grep -E "SPARKY_FITNESS_DB_PASSWORD=|SPARKY_FITNESS_APP_DB_PASSWORD=|SPARKY_FITNESS_FRONTEND_URL=|SPARKY_FITNESS_API_ENCRYPTION_KEY=|BETTER_AUTH_SECRET=" .env | grep -v "^#"
Expected output:
1
2
3
4
5
SPARKY_FITNESS_DB_PASSWORD=YourSecureDBPassword123!
SPARKY_FITNESS_APP_DB_PASSWORD=YourSecureAppPassword456!
SPARKY_FITNESS_FRONTEND_URL=http://192.168.1.102:3004
SPARKY_FITNESS_API_ENCRYPTION_KEY=7e1c9646a5eb91961a3dd6296197f82cb243ff7e526df359530df8a4b7b3492a
BETTER_AUTH_SECRET=8d7eac5d453fa292ce5bf259f0376f9c6b13de1d109b561fde2f3f196fc1b649
Step 6: Pull Docker Images
Download the required Docker images:
1
docker compose pull
This downloads:
postgres:15-alpine- PostgreSQL databasecodewithcj/sparkyfitness_server:latest- Backend applicationcodewithcj/sparkyfitness:latest- Frontend application
Wait for download to complete before proceeding.
Step 7: Start Services
Start all SparkyFitness services:
1
docker compose up -d
Expected output:
1
2
3
4
5
[+] Running 4/4
✔ Network sparkyfitness_sparkyfitness-network Created
✔ Container sparkyfitness-sparkyfitness-db-1 Started
✔ Container sparkyfitness-sparkyfitness-server-1 Started
✔ Container sparkyfitness-sparkyfitness-frontend-1 Started
Note: Warnings about email variables are normal and can be ignored if you’re not configuring email notifications.
Step 8: Verify Services are Running
Check that all containers are healthy:
1
docker compose ps
Expected output:
1
2
3
4
NAME IMAGE STATUS
sparkyfitness-sparkyfitness-db-1 postgres:15-alpine Up (healthy)
sparkyfitness-sparkyfitness-frontend-1 codewithcj/sparkyfitness:latest Up (healthy)
sparkyfitness-sparkyfitness-server-1 codewithcj/sparkyfitness_server:latest Up (healthy)
All three containers should show status “Up” with “(healthy)” indicators.
Step 9: Verify Database Initialization
Confirm database tables were created:
1
docker exec -it sparkyfitness-sparkyfitness-db-1 psql -U sparky -d sparkyfitness_db -c "\dt"
You should see 58 database tables listed, confirming migrations ran successfully.
Configuration
Docker Compose Services
The application consists of three services:
- sparkyfitness-db (PostgreSQL 15 Alpine)
- Database server for storing all application data
- Data persisted in volume:
../postgresql - Internal network only (not exposed)
- sparkyfitness-server (Node.js/Express Backend)
- REST API for frontend communication
- Handles authentication, data processing, AI integration
- Backup volume:
./backup - Uploads volume:
./uploads - Internal port 3010 (not exposed)
- sparkyfitness-frontend (React Application)
- User interface served by Nginx
- External port mapping:
0.0.0.0:3004->80/tcp - Accessible at:
http://YOUR_VM_IP:3004
Data Persistence
Data is stored in Docker volumes:
- Database:
../postgresql(one directory up from installation) - Backups:
./backup(in installation directory) - Uploads:
./uploads(profile pictures, exercise images)
Network Configuration
All services communicate on the sparkyfitness-network bridge network:
- Database accessible as
sparkyfitness-db:5432 - Backend accessible as
sparkyfitness-server:3010 - Frontend routes API requests internally
Verification
Access the Web Interface
- Open a web browser
- Navigate to:
http://192.168.1.102:3004(use your VM’s IP) - You should see the SparkyFitness login/registration page
Check Container Logs
View backend server logs:
1
docker compose logs sparkyfitness-server
View frontend logs:
1
docker compose logs sparkyfitness-frontend
View database logs:
1
docker compose logs sparkyfitness-db
Check Container Resource Usage
Monitor resource consumption:
1
docker stats
Press Ctrl+C to exit.
First Use
Create Your Account
- On the SparkyFitness homepage, click Sign Up or Register
- Fill in your details:
- Email address
- Password
- Name (optional)
- Click Create Account
Initial Setup Questionnaire
After registration, complete the onboarding:
- Personal Information
- Sex/Gender
- Age, height, current weight
- Goals
- Weight loss, maintenance, or gain
- Target weight
- Timeline
- Activity Level
- Sedentary, lightly active, moderately active, very active, extremely active
- Nutrition Plan
- Daily calorie budget (calculated automatically)
- Macro distribution (carbs/protein/fats)
- Micronutrient goals
- Meal distribution percentages
- Save Your Plan
- Click “Start 6-Month Cascading Plan” to begin
Main Dashboard Features
After setup, you’ll have access to:
- Diary - Log meals, exercise, water intake
- Food Database - Search and add custom foods
- Exercise Database - Log workouts
- Goals - Track progress toward targets
- Reports - View nutrition and body metric trends
- AI Assistant - Chat-based food logging with image recognition
- Measurements - Track body measurements over time
- Settings - Customize preferences, connect external services
Management Commands
Stop Services
Stop all containers without removing data:
1
docker compose stop
Start Services
Start stopped containers:
1
docker compose start
Restart Services
Restart all services:
1
docker compose restart
View Logs
Follow logs in real-time:
1
docker compose logs -f
Specific service logs:
1
docker compose logs -f sparkyfitness-server
Update to Latest Version
Pull latest images and restart:
1
2
docker compose pull
docker compose up -d
Note: Always check release notes for breaking changes before updating.
Backup Database
Manual database backup:
1
docker exec sparkyfitness-sparkyfitness-db-1 pg_dump -U sparky sparkyfitness_db > backup_$(date +%Y%m%d_%H%M%S).sql
Restore Database
Restore from backup file:
1
cat backup_YYYYMMDD_HHMMSS.sql | docker exec -i sparkyfitness-sparkyfitness-db-1 psql -U sparky -d sparkyfitness_db
Complete Shutdown and Cleanup
Stop and remove all containers and networks (preserves volumes):
1
docker compose down
Destructive cleanup (removes volumes - deletes all data):
1
docker compose down -v
⚠️ WARNING: The -v flag permanently deletes your database!
Troubleshooting
Port Already in Use
If port 3004 is in use:
- Check what’s using it:
1
sudo lsof -i :3004
- Either stop the conflicting service or change the port in
docker-compose.yml:1 2 3
sparkyfitness-frontend: ports: - "8080:80" # Change 3004 to 8080 or another free port
- Also update
SPARKY_FITNESS_FRONTEND_URLin.envto match.
Cannot Connect to Database
Check database container is running:
1
docker compose ps sparkyfitness-db
Check database logs for errors:
1
docker compose logs sparkyfitness-db
Verify database credentials in .env match docker-compose.yml.
Frontend Shows “Cannot Connect to Server”
- Check backend is running:
1
docker compose ps sparkyfitness-server
- Check backend logs:
1
docker compose logs sparkyfitness-server
- Verify
SPARKY_FITNESS_FRONTEND_URLin.envis correct.
Reset Everything and Start Fresh
Complete reset (deletes all data):
1
2
docker compose down -v
docker compose up -d
This will:
- Stop all containers
- Remove volumes (delete database)
- Recreate everything from scratch
Check Service Health
View detailed container status:
1
2
docker compose ps
docker inspect sparkyfitness-sparkyfitness-server-1
Access Container Shell
Debug inside containers:
1
2
3
4
5
6
7
8
# Backend
docker exec -it sparkyfitness-sparkyfitness-server-1 sh
# Database
docker exec -it sparkyfitness-sparkyfitness-db-1 psql -U sparky -d sparkyfitness_db
# Frontend
docker exec -it sparkyfitness-sparkyfitness-frontend-1 sh
Resources
Official Documentation
- Main Documentation: https://codewithcj.github.io/SparkyFitness
- GitHub Repository: https://github.com/CodeWithCJ/SparkyFitness
- Docker Installation Guide: https://codewithcj.github.io/SparkyFitness/install/docker-compose
Community Support
- Discord Community: https://discord.gg/vcnMT5cPEA
- GitHub Issues: https://github.com/CodeWithCJ/SparkyFitness/issues
- GitHub Discussions: https://github.com/CodeWithCJ/SparkyFitness/discussions
Additional Guides
- Reverse Proxy Setup: For adding HTTPS with Nginx Proxy Manager or Traefik
- Backup Strategies: Automated backup configurations
- Mobile App: iOS/Android companion app setup
- External Integrations: Connect Fitbit, Garmin, Apple Health
Important Notes
- Beta Status: Some features (AI chatbot, multi-user, family sharing) are in beta
- Active Development: Breaking changes possible - read release notes before updating
- Auto-updates Not Recommended: Manually update after reviewing changelogs
- Security: Change default passwords, use strong encryption keys
- Data Privacy: Self-hosted = you control your data completely
Installation Summary
Installation Directory: ~/sparkyfitness
Access URL: http://192.168.1.102:3004
Database: PostgreSQL 15 Alpine
Data Location: ~/postgresql (database), ~/sparkyfitness/backup, ~/sparkyfitness/uploads
Services: 3 Docker containers on bridge network
Port Exposed: 3004 (frontend only)
Installation Time: ~10 minutes
Status: ✅ Successfully Installed and Running
Next Steps
- Explore the Dashboard - Familiarize yourself with the interface
- Log Your First Meal - Try the food search and logging features
- Set Up Backup Schedule - Automate database backups
- Configure Reverse Proxy (Optional) - Add HTTPS access
- Enable AI Features (Optional) - Configure OpenAI/Anthropic API keys
- Invite Family Members (Optional) - Set up additional user accounts
Mobile Access Configuration (Critical)
Overview
To access SparkyFitness from your phone (anywhere, not just on your local network), you need to configure Tailscale and update the frontend URL. Without this configuration, you’ll get an “Invalid origin” error when trying to log in from mobile devices.
Prerequisites
- Tailscale installed on your VM
- Tailscale installed on your phone
- Both devices connected to the same Tailnet
Step 1: Install Tailscale on the VM
If you haven’t already installed Tailscale on your VM:
1
2
curl -fsSL https://tailscale.com/install.sh | sh
sudo tailscale up
Follow the authentication link to connect your VM to your Tailnet.
Step 2: Get Your Tailscale IP Address
Find your VM’s Tailscale IP:
1
tailscale status
Example output:
1
100.125.36.126 sparky-fitness-vm mark@ linux -
Your Tailscale IP is 100.125.36.126 (yours will be different).
Step 3: Update Frontend URL Configuration
Edit your .env file to use the Tailscale IP instead of the local IP:
1
2
cd ~/sparkyfitness
nano .env
Find this line:
1
SPARKY_FITNESS_FRONTEND_URL=http://192.168.1.102:3004
Change it to your Tailscale IP:
1
SPARKY_FITNESS_FRONTEND_URL=http://100.125.36.126:3004
Important: Replace 100.125.36.126 with YOUR actual Tailscale IP address from Step 2.
Save the file (Ctrl+O, Enter, Ctrl+X).
Step 4: Restart Services with New Configuration
A simple restart doesn’t reload environment variables. You must fully stop and start:
1
2
docker compose down
docker compose up -d
Step 5: Verify Configuration
Confirm the new URL was loaded:
1
docker compose logs sparkyfitness-server | grep "SPARKY_FITNESS_FRONTEND_URL"
Expected output:
1
DEBUG: SPARKY_FITNESS_FRONTEND_URL is: http://100.125.36.126:3004
Step 6: Access from Your Phone
- Install Tailscale on your phone (iOS or Android)
- Connect to your Tailnet using the same account
- Open your phone’s browser (Safari on iPhone, Chrome on Android)
Navigate to:
http://YOUR_TAILSCALE_IP:3004Example:
http://100.125.36.126:3004- Log in with your SparkyFitness credentials
Why This Works
- Local network access: The Tailscale IP works on your home network too
- Remote access: Works from anywhere when connected to Tailscale
- Single configuration: One URL works in all locations
- CORS security: The backend only accepts connections from the configured frontend URL
Troubleshooting Mobile Access
Problem: “Invalid origin” error when logging in
Solution:
- Verify the
.envfile has the Tailscale IP:1
grep SPARKY_FITNESS_FRONTEND_URL ~/sparkyfitness/.env Ensure you did
docker compose downandup -d(not justrestart)- Check the logs show the correct URL:
1
docker compose logs sparkyfitness-server | grep "SPARKY_FITNESS_FRONTEND_URL"
Problem: Can’t connect from phone
Solution:
- Verify both devices are connected to Tailscale:
1
tailscale status
Verify Tailscale is running on your phone (check the Tailscale app)
- Try pinging the VM from your phone using a network utility app
Problem: Want to use both local IP and Tailscale IP
Solution: The SPARKY_FITNESS_FRONTEND_URL variable only accepts one URL. Using the Tailscale IP works everywhere (local and remote), so there’s no need for the local IP anymore.
Mobile Experience
The SparkyFitness web interface is fully responsive and mobile-optimized:
- Full functionality - All features work on mobile browsers
- Touch-friendly - Optimized for touch interactions
- No app required - Works in Safari (iOS) or Chrome (Android)
- Bookmark it - Add to your home screen for quick access
Optional: Add to Phone Home Screen
iOS (Safari):
- Open SparkyFitness in Safari
- Tap the Share button
- Scroll down and tap “Add to Home Screen”
- Name it “SparkyFitness”
- Tap “Add”
Android (Chrome):
- Open SparkyFitness in Chrome
- Tap the three dots menu
- Tap “Add to Home screen”
- Name it “SparkyFitness”
- Tap “Add”
Now you have a convenient icon on your home screen that launches SparkyFitness directly!
API Key for Advanced Integrations (Optional)
If you want to integrate with Apple Health Shortcuts or Android Health Connect:
- Log in to SparkyFitness web interface
- Go to Settings
- Navigate to API Keys section
- Click Generate API Key
- Give it a name (e.g., “iphone-shortcuts”)
- Copy the generated key
- Use this key in your health integration shortcuts/apps
Server URL for integrations:
1
http://YOUR_TAILSCALE_IP:3004/health-data
Summary
Installation Directory: ~/sparkyfitness
Local Access URL: http://192.168.1.102:3004 (deprecated)
Mobile/Remote Access URL: http://100.125.36.126:3004 (via Tailscale)
Database: PostgreSQL 15 Alpine
Data Location: ~/postgresql (database), ~/sparkyfitness/backup, ~/sparkyfitness/uploads
Services: 3 Docker containers on bridge network
Port Exposed: 3004 (frontend only)
Tailscale Integration: ✅ Configured for mobile access
Installation Time: ~10 minutes
Mobile Setup Time: ~5 minutes
Status: ✅ Successfully Installed and Accessible from Mobile
Document Version: 1.1
Installation Date: February 7, 2026
Mobile Configuration Added: February 7, 2026
Installed By: Mark
System: sparky-fitness-vm (192.168.1.102)
Tailscale IP: 100.125.36.126
Status: Production Ready with Mobile Access ✅